Category Archives: Uncategorized

NAVIGATION & SIGNALING TIPS & TRICKS

Excerpts from Survival Tips, Tricks and Traps by Wanda & William Priday, Chapter 8 Navigation, Travel & Signaling

No phone, no compass, no problem. Learn how to navigate directions day or night without modern technology in Chapter 8 Navigation and Signaling.  If you’re traveling roads and interstates in the US, learn how the road numbering system conveys vital directional information.  Need to be rescued? Multiple ways to signal for help are relayed in this chapter.  

ORIENTATION TRICKS!

An East-West orientation can be obtained by using a stick, pebbles and the sun (Fig. 8-1) Push a 2’ stick into a flat patch of sunny ground at a 90o angle. Mark the tip of where the shadow falls with a pebble. Wait 15 minutes and place another pebble at the tip of where the shadow falls. Draw a line between the 2 pebbles. This line is oriented to the East and West. The longer you wait, the longer your space between markers will be and the more accurate your reading will be. You can also use a straight edge and hold it directly over the pebble markers to extend the line. The sun rises in the East and sets in the West.  Once you know your East-West orientation, you can then determine North/South.

A North-South orientation can be obtained by knowing what time it is. Point the hour hand of a watch or clock directly at the sun. If your watch or phone has a digital readout, draw a clock face with hour and minute hands set to the actual time. Halfway between where the hour hand is pointing and 12 on the watch face is the North-South Line. Once you have determined your North – South Line, consider the following image (Fig. 8-2) to determine which is North and which is South.

The North Star does not move, all other stars rotate in a circle around it. Even if you cannot find the North Star you can still orient yourself at night. Find a thin forked stick, and a thin straight stick of similar length. Push the straight stick into the ground. Line it up with a star near the horizon. The forked stick is placed about 2’(feet) to the rear (as in a rear gun sight aperture) of the straight stick. Line up the star, the top of the straight stick and the Y of the forked stick. Try and imagine you have a rifle and are lining up your sights to shoot a star. You want to use a star near the horizon with greater movement, because stars closer to due North are circumpolar and will move in smaller circles. Watch to see which way the star moves from its original position for about 10 to 15 minutes. As the star moves, use the following directional key to decipher the direction you are facing.

LeftUpRightDown
NorthEastSouthWest

If the star moved Right you would be facing South, if it moved Left and Up you would be oriented to the North East, Up and Right would be South East, etc. Remember the KEY to this is:

LURD
NESW

To ensure accuracy, repeat this process facing the opposite direction.  Your findings should lead you to the same conclusion if you have determined your orientation correctly both times.  For example, if your original finding was that you were facing West, your second finding (now facing opposite) should show you are facing East. There is also the off chance you have oriented on Venus, Mars or another visible planet, which will not give an accurate reading. Repeat the process using several different stars in the sky to ensure an accurate reading.

TIME

So, you don’t wear a watch and your cell phone is dead, damaged or lost. To tell the time of day, or how much daylight you have left, hold your hand flat, palm facing you, with your fingers parallel to the horizon, stacking your hands one on top the other, between the horizon and setting sun, allowing 15 minutes for each finger will give you the approximate hours of daylight left.

ROAD NAVIGATION TRICKS!

In the United States, you can tell whether an interstate highway runs north–south or east–west by its one or two-digit number. Although, in some cases an interstate doesn’t run exactly north to south or east to west, the number was assigned based on the road’s general direction.

Odd-numbered interstates run north–south, and the numbers increase as you travel from the West Coast (I-5) to the East coast (1-95).

Even-numbered interstates run east–west, and the numbers increase as you go from south (I-10) to north (1-94).

Interstate highways with three digits are those that connect to other major highways and interstates.

If the first number is an even number, it means the highway connects to another interstate highway at both ends, such as a beltway or a loop around a city.

If the first digit is an odd number, the highway is usually a spur route, which means it connects with an interstate at one end only, for example, a road that goes into a city.

SIGNALING FOR RESCUE

Contrast in color and large movements are the keys to being spotted by rescue personnel.

Learn to use a signal mirror. Most come with the instructions on the back. If you don’t have a signal mirror, any mirror will do. Put two fingers out in front of you in a “peace” or “victory” sign. Use your fingers to sight in on the target you want to flash. Now with the reflective surface of the mirror facing away from you bring the mirror up between your eyes and your sighted target. Angle the mirror until you get the suns reflection on your sight. Keep in mind your target’s location in reference to the sun, you may need to pivot the mirror in a side to side motion, as well as up and down.

Carry a whistle. Yelling for help is definitely an option, but you will lose your voice quickly.  If you are alone, not a big deal, but if you are with others, you need your voice to communicate vital information with them to survive.

Our faithful survival chemical, potassium permanganate can be added to water to create a purple dye for a contrasting signal on the snow or light-colored ground.

Create what is called a buzz saw signal by tying cordage to your flashlight and swinging it in a circle to create contrast and movement at nighttime.  This signal can be seen by ground or air rescuers. Make sure it is securely tied or you could end up slinging your light into the great beyond or your survival partner’s head.

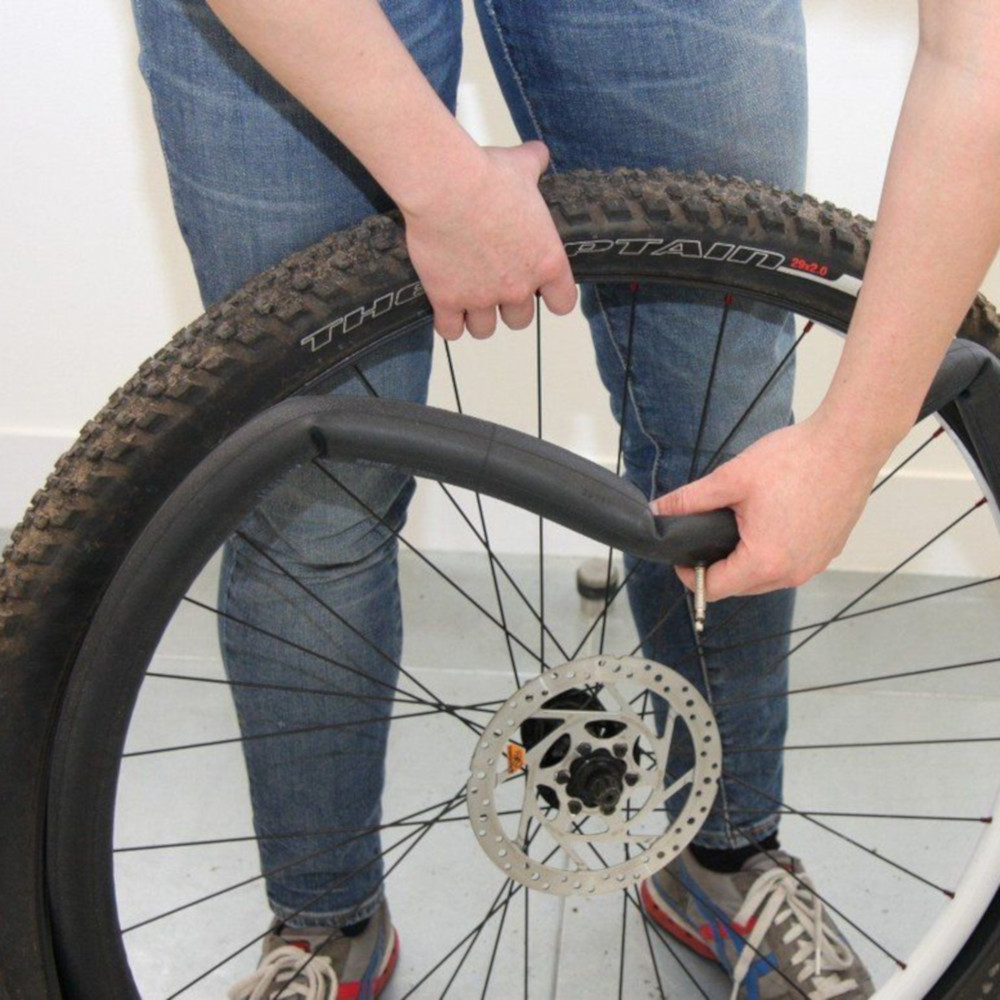
A tire, a shoe, rubber floor mat or any rubber material is flammable and when caught on a fire will create thick, black smoke and creates aerial contrast and movement. This method is most effective on a calm, windless day and less effective in high winds. Always remember to deflate a tire before burning. As a side note, if you don’t burn all your floor mats signaling for help, they serve as a moisture barrier and keep your butt dry and off the ground.

Three fires arranged in a regularly spaced row is an international distress signal. During the day, you can also attract attention with smoke. Green wood and leaves produce smoke. Start a fire using dry wood and add smoke producing material once it gets going.

Flares are an obvious signaling tool, ignite and wave it over your head or move in a circle to attract attention.

Flare guns are more effective than a flare, firing it up into the air allows you to clear visual obstructions and attract attention over several miles. Don’t point it at your face or another person. They can definitely cause injury.

Flags can be easily improvised, a national flag flown upside down is considered a distress symbol. In more recent years, this can also indicate an abandoned ship, national dissidence or a sign of war, subsequently not all countries recognize the inverted flag as a distress symbol.  However, a knot tied in any flag, a white flag or a flag with a square and a circle on it are all considered international distress symbols. (Seafaring vessels usually carry a pre-made orange SOS flag containing a square and circle.)

The above-mentioned visual signals can work, but sometimes you’ll need to communicate a more significant message to an aircraft. We’ve all seen movies where the actors use huge “SOS” signs on a beach to signal aircraft.  These are only effective when there is contrast between the “SOS” and the background. Create them with clothing, rocks, plants, sticks or anything else that’s clearly visible.

You will know that an airplane has spotted you when it tips its wings back and forth.  This is internationally known as the pilot saying, “I see you.”

RECOMMENDED EDC (EVERYDAY CARRY) & BOB (BUG OUT BAG) CHECKLISTS!

EDC CHECKLIST

  • Knife
  • Multi tool
  • Lighters
  • Micro Fishing Kit 
  • Mini Flashlight
  • Whistle
  • Mylar Survival Blanket
  • Water Bottle(s)
  • Eyeglasses
  • Essential and Common Medications
  • Identification & Copy of ICE (in case of emergency) contact list
  • Snack bar(s)

The short EDC checklist should be incorporated into the BOB checklist. The redundancies are intended. Your BOB becomes your EDC when you BO.

BOB CHECKLIST

  • Machete & Saw
  • Small Spade/Shovel or Entrenching Tool
  • Knife (duplicate)
  • Multi tool (duplicate)
  • Blade sharpener
  • 550 cord
  • Duct Tape
  • Wire
  • Surveyors Tape
  • Cable Ties
  • Bungee Cords
  • Lighters (at least 3)
  • Candles
  • Matches
  • Flares
  • Ferro rod/Mag bar 
  • Fishing kit (duplicate)
  • 1st Aid kit, including suture kit, ace bandages, & moleskin
  • Chapstick
  • LED Mini flashlights/Headlamps/Lantern
  • Batteries (AA, AAA, etc.)
  • Emergency USB charger
  • Tarps/Shower curtains
  • Additional Mylar Survival blankets
  • 2-quart wide mouth metal bottle w/ metal top / Wide metal cup
  • Food for 72 hrs – dried foods, peanut butter, drink mix, etc.
  • Water for 72 hrs or as much as you can carry
  • Water purification tablets/Water purifier or Life straw
  • Extra clothes – seasonally appropriate
  • Socks & Boots/Shoes you can walk comfortably in
  • Jacket/Poncho
  • Hat
  • Heavy-duty Leather Gloves
  • Extra Prescription Medications
  • Antihistamines/Ibuprofen/Activated Charcoal
  • Extra eyeglasses/Contact lenses
  • Toilet paper/Napkins/Tissues/ Wet wipes
  • Gallon Ziploc Baggies
  • Maps/Compass
  • Mini-Radio with solar or hand crank power backup
  • Childcare items as needed (diapers, sippy cup, blanket, etc)
  • Quick start fluid/Fuel/Tablets
  • Guns/Ammo
  • 5-Gallon Bucket (packed with BOB items and can fit in an Alice Pack)
  • A Towel 
  • Hardcopy of Survival Tips, Tricks & Traps by Wanda Priday & William Priday

Check out Survival Tips, Tricks and Traps by Wanda & William Priday

Run out of hand sanitizer or toilet paper? These antimicrobial plants can be used for both, as well as, wound care.

During a without rule of law (WROL) scenario you must bug in; how do you proof your home to increase the safety of your family & possessions?

Don’t have a lighter or matches, discover multiple ways in each of the following categories to start a fire: solar, electrical, chemical, friction and percussion.

Lost in the woods and drank all the water in your pack, but found a creek, how do you turn that into safe drinking water?  

Want to know how to open a can without a can opener or how to make a slingshot with a condom and stick? How many ways can you use a hat to increase your survivability?

No phone, no compass, no problem. Learn how to navigate directions day or night without modern technology. 

Through trap illustrations & directions, we show you how to set up and catch small, medium and large game, including fish and birds.

Learn these tips, tricks, traps and so much more inside Survival Tips, Tricks & Traps by Wanda & William Priday, now available on Amazon.com.

survivaltttcover42820-crop

9 Everyday Items and Their Multiple Survival Uses

Excerpts from Survival Tips, Tricks and Traps by Wanda Priday & William Priday

In an emergency, items that did not have much value before can be life savers. Learn to be creative and learn how to improvise.  These 9 everyday items have multiple uses in a survival situation.

Bike-Inner-Tube-Sizes-Chart

  1. Inner tubes from bicycle tires can be a great resource because of their versatility. Add one to your BOB or EDC. Cutting it into rings creates rubber bands and ranger bands (heavy duty rubber bands). Cut in a spiral it creates a long piece of cordage. Take out the valve stem, replace it with smaller tubing and seal where the 2 join and you have a mini camelback. Innertubes can be used as a tourniquet. They are also a waterproof container for items that you want to keep dry. Or as a water container that can be resealed using heat. If you heat it to melting point you can use it as a sealant such as patching a boat or floatation device. It serves as a fire starter, accelerator and produces black smoke for signaling. It’s a great asset in making traps and weapons when used as an action intensifier, such as a sling shot or Hawaiian sling.
  2. Condoms can be a good waterproof place to store and keep tinder, matches, a lighter or any other item you need to keep dry. A condom can be a water container and fortified by carrying in a t-shirt or garment. If you have a somewhat opaque or almost transparent colored condom, it can be filled with water and used as a solar lens to start a fire.  Even a slingshot can be improvised using a condom.  Find a thick Y shaped stick that will fit well in your hand.  Cut notches into the tops of Y.  Create an ammo pouch with a small sturdy rectangle shaped piece of fabric with 2 small slits cut on each side.  Tie a knot in one end of 2 condoms and slide the knotted condom ends into the notches of the stick, then tie the other end of the condom around the slit in an ammo pouch.
  3. Tampons can be used as a sterile wound dressing. The cotton also makes great fire tinder when pulled apart and fluffed. The plastic sheath can be turned into a fishing bobber.  The plastic sheath and wrapper can be used to help start or extend a fire. Together the cotton and plastic sheath can also be used as a straw to filter out water turbidity.
  4. Cigarettes, whether you smoke or not, can be a useful item in survival scenarios, a fire can be lit from the ember, mixed with saliva the tobacco is balm for insect bites and cuts. The smoke from them can keep insects away.  In almost any survival scenario, they become currency and when offered to someone can make the difference between friend or foe.woman-1150111_1280
  5. A hat, especially a wide brimmed leather or canvas hat can be used as shade, a container, a rain catch, and a thermo-regulator. It can assist you in fanning a fire or swatting away bugs. It can also provide concealment for clandestine activities or a place to store items out of site while you are wearing it.
  6. The umbrella is underrated. It can double as a walking stick, a shelter, a self-defense weapon, a rain catch, and shade from the hot sun. It is lightweight and small and can truly be a life saver. Keep one or 2 handy.
  7. A scarf or wrap takes up little space and has multiple uses. Used as a head-cover to stay warm or out of the sun, as a face cover to filter dust, debris, or smoke, as a bandage and when cut into strips becomes cordage.images
  8. A space blanket can be used in lieu of a tarp to create a makeshift shelter. It can serve as a rain catch when laid on the ground with the edges propped up using earth, rocks or carefully placed sticks to create a large low bowl shape.  Because of their reflective nature they make a great signaling device. Space blankets also make a crinkly noise that can be set up to notify you of someone or something approaching through a door or window. Two space blankets and 13–15 ft. of duct tape can create a fantastically warm sleeping bag. Space blankets work by trapping your body heat and reflecting it back at you. However, they do not allow for water vapor from breathing and sweating to escape, so to keep condensation away from you, stay clothed and/or line the bag with a wool blanket.
  9. A towel can be wrapped around you for warmth. It’s a cover that creates shade and it can keep you off the ground. Wet it to use as a club, whip or entanglement device. Snap someone in the eye with it or put an object in the end of it, such as a stone, and it becomes a blackjack or flail. Dragging it through the morning dew may yield enough water to be worth the effort.  It can be a transfer device, by absorbing water with it from a difficult to access water source and then wring it out into a container. It can also be a signaling device when waved and when push really comes to shove you can dry off with it. Hitchhikers across the galaxy highly recommend carrying a towel!

4 Alternative Ways to Start a Fire (excerpts from Survival Tips, Tricks and Traps)

A battery can create enough heat to start a fire. Touch the positive and negative ends of almost any battery (including a cell phone battery) with wire, steel wool, a strip of aluminum foil, a foil backed gum wrapper, a wire bread tie, or the foil from a cigarette pack to create heat enough to light a very fine tinder. This is not an easy method and can burn your fingers; you may want to practice this in advance. Using steel wool is the easiest to light tinder, gum wrappers and lighter material burns quick and hot. Have the metal touch the tinder as you connect the ends to the battery. A cigarette or cigar can be substituted for tinder to create a slower burning ember.

 Projection TV sets from the 80’s, contain a Fresnel lens as the screen. They also make them in many other sizes for magnified reading, etc. Book stores and craft stores will carry various sizes that will be weightless in your B.O.B. Use it to start a fire and even cook with in bright sun. Hold the lens in the bright sun over a bundle of tinder, focus the point of light on the tinder, steadily until it starts to smolder and catch flame. Add additional tinder, twigs until established, then ad more sticks, getting bigger as the fire builds. Use it to start a fire and even cook with in bright sun.

yabbies summer 2013 021 A third way to alternatively create fire is to use clear plastic, such as cellophane or garbage bags, can also be attached to a frame, like you are putting glass in a large picture frame except you use plastic and secure it all the way around with tape. Mount the frame off the ground, using four forked sticks as a stand. Pour water into the frame, the water will create a belly and function as a lens. The height will need to be adjusted so that the bottom of the lens focal point is off of the ground. Move your tinder bundle to the focal point, ad mass underneath the tinder bundle (rock, wood, etc) to set it in place. Be careful to watch the process carefully, you want to remove the tinder as soon as it catches, otherwise, you will melt the lens and water will splash down and put out your embers. This is a fun one to do in the back yard with the kids, it also takes some practice.

 And lastly, a chemical reaction fire, potassium permanganate mixed with glycerin. These 2 ingredients are often found in traditional 1st aid kits and the potassium permanganate can be used to sterilize wounds and water. My favorite thing about this trick is that you can find potassium permanganate in the “stay – fresh packets” that come with cut flowers and glycerin or glycol is found in antifreeze.  Who knew you could start a fire with fluids from your car and flowers from your friend.

#surthrive, #survival, #selfreliance, #bushcraft #saltheartpublishers #womensselfreliance

 Content by William Priday, Edited by Wanda Priday

Copyright © 2014.

Introduction

Hello Everyone,

Thanks for taking time to check out my blog.  I have created this space to share bushcraft, survival and emergency preparedness information.  I hope you will find the videos and writings useful.  Beyond all that I have learned over the years, having a basic knowledge of how to take care of myself and my family in a survival or grid down scenario has given me self confidence and allowed me to live more freely in my life.  This website is dedicated to the memory of my husband, William Priday, who taught me a lot of what I know and who will be missed deeply.

556526_3649500470799_1298905425_n

Quote

Situational Awa…

Situational Awareness – An excerpt from the upcoming New Book “Women’s Self Reliance & Emergency Preparedness”

Situational Awareness is the practice of being aware of your environment and the situation you are in at all times.  This is not a paranoid, hyper awareness but a little forethought and contemplation about your surroundings.  Take some time out and think about where you are live, your neighbors and town.  Think about where you go, what the environment is like, what the weather will be and the potential for it to fluctuate?  What environment do you find yourself in most?  What are the potential hazards of where you are going to be?

 Being aware of your surroundings and knowing what your options are in your surroundings is being situational aware.

This is not just about walking down the street and looking around you through mundane, everyday eyes, but its about looking beyond what you accept as daily, normal and only applicable to you.  Look into what is really happening right around you and in front of you.  Our world is getting smaller, through the vast amount of technological advancements and lightning speed communication.  The entire world is your world and what happens in it affects you.  Be aware of the world in which you live in; be aware of its strengths and weaknesses.  Be aware of its condition and how it impacts your species, your country, your state, your town, your friends, your family and your life. This concept spans the entirety of our lives, from recognizing the facts that you live in a city with 15 million other people within 15 miles of you and the recognition that the grocery stores get food shipped to them.  It is grown and produced far away from where you are.  Be aware of the political climate, the economic indicators, the weather, the crime rate.  Situational awareness requires us to look at life on many levels and in connection with the bigger whole of our world.

It also asks us to look closely at what we have and how we can best utilize what we have at our disposal.  One true trait of being self reliant and a survivor is training your self to see opportunity in everyday situations and materials.

 Mental Exercise – Imagine an emergency has occurred where you are on Manhattan Island and the grocery stores have been empty for a day or 2 and the bridges are blocked by abandoned cars or by the National Guard.  What makes the most sense for your survival?  Should you bug out or bug in?  Are you going to wait for someone to bring relief and goods?  Think about the shear logistics of supplying food and water to 1.6 million people with the power out.  Evaluate the risks associated with being in the middle of an emergency in a city.  Many 911 survivors and witnesses will tell you that all of Manhattan was in complete chaos.

Exodus not likely.  Just being aware of this reality, is crucial to your survival. Preparation is key when there is a limited amount of supplies available at any given time in proximity to you.